Installation: Difference between revisions
No edit summary |
No edit summary |
||
| (13 intermediate revisions by 3 users not shown) | |||
| Line 1: | Line 1: | ||
4 Steps to Fly on UniFly! | |||
=== Requirements: === | === Requirements: === | ||
350MB Disk Space, | 350MB Disk Space, | ||
| Line 8: | Line 10: | ||
Windows 10 or above. | Windows 10 or above. | ||
=== | == INSTALLATION == | ||
=== Step 1: Download UniFly: === | |||
=== | |||
Once you have download UniFly from: | Once you have download UniFly from: | ||
https://unifly.gg/ | https://unifly.gg/downloads/setup.exe | ||
You may need to allow your anti-virus to download! - Once downloaded you can then run the setup wizard, follow each step, it will be slow on the "Configuration" screen, this is normal! Once UniFly has been installed please RESTART your computer. | |||
==== | == CONFIGURATION == | ||
==== Step 2: First Time Configuration Wizard (Step 1) ==== | |||
==== Step 2: | |||
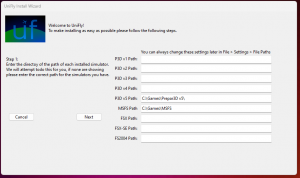
[[File:Install Wizard File Paths.png|thumb|Installation Wizard asking for your current file paths.]]While we hope that our installation wizard has detected your installation of all your simulators this cannot always be guaranteed. | [[File:Install Wizard File Paths.png|thumb|Installation Wizard asking for your current file paths.]]While we hope that our installation wizard has detected your installation of all your simulators this cannot always be guaranteed. | ||
| Line 89: | Line 28: | ||
'''NOTE: MSFS''' We will be requiring the location of your Community & Official Folder, all others should be pointed to the root directory of the simulator. | '''NOTE: MSFS''' We will be requiring the location of your Community & Official Folder, all others should be pointed to the root directory of the simulator. | ||
'''Click Next''' | |||
==== Step 3: First Time Configuration Wizard (Step 2) ==== | |||
==== Step | |||
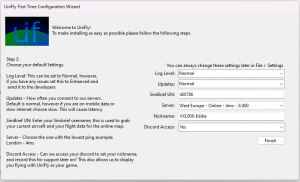
[[File:Step 2.png|thumb|<nowiki>Step 2 | Configuration Options</nowiki>]]On this window you will be asked to choose your preferred settings. | [[File:Step 2.png|thumb|<nowiki>Step 2 | Configuration Options</nowiki>]]On this window you will be asked to choose your preferred settings. | ||
| Line 100: | Line 38: | ||
'''Updates:''' The default option of "Normal" is sufficient for most connections, however if you have a slow bandwidth connection use Slow. (This is how frequently we poll to our servers). | '''Updates:''' The default option of "Normal" is sufficient for most connections, however if you have a slow bandwidth connection use Slow. (This is how frequently we poll to our servers). | ||
'''Simbrief UN:''' This is your simbrief Username | '''Simbrief UN:''' This is your simbrief Username/UserID | ||
'''Server:''' Choose a server from the list with a low ping (Name - Status - Ping - Users) | '''Server:''' Choose a server from the list with a low ping (Name - Status - Ping - Users) | ||
'''Nickname:''' Choose a nickname to be identified by on the map and client lists. | '''Nickname:''' Choose a nickname to be identified by on the map and client lists. | ||
'''Discord Access:''' Can We access discord to show you are using UniFly? | |||
| Line 111: | Line 51: | ||
You can always change any settings in '''[[Client:Settings|File > Settings]]''' | You can always change any settings in '''[[Client:Settings|File > Settings]]''' | ||
== USING UNIFLY == | |||
==== Step | ==== Step 4: Fly! ==== | ||
[[File:UniFly Client Window.png|thumb | [[File:UniFly Client Window.png|thumb]] | ||
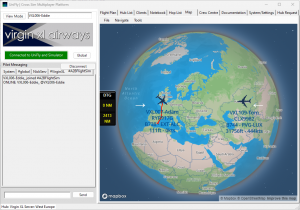
You have now successfully installed and configured UniFly! | |||
Simply connect to your Simulator, this will turn GREEN if we have connected correctly to an open simulator. | Simply connect to your Simulator, this will turn GREEN if we have connected correctly to an open simulator. | ||
Each user will spawn in as your current aircraft | |||
'''note''': ''Large FENX models can cause your simulator to crash, for this reason we recommend using FSLTL or FLAI - Read more on our [[Model Matching|Model Matching Wiki Page]]'' | |||
=== Hubs and further settings === | === Hubs and further settings === | ||
Latest revision as of 18:06, 25 February 2024
4 Steps to Fly on UniFly!
Requirements:
350MB Disk Space,
1GB Ram,
32Bit CPU
Windows 10 or above.
INSTALLATION
Step 1: Download UniFly:
Once you have download UniFly from:
https://unifly.gg/downloads/setup.exe
You may need to allow your anti-virus to download! - Once downloaded you can then run the setup wizard, follow each step, it will be slow on the "Configuration" screen, this is normal! Once UniFly has been installed please RESTART your computer.
CONFIGURATION
Step 2: First Time Configuration Wizard (Step 1)
While we hope that our installation wizard has detected your installation of all your simulators this cannot always be guaranteed.
For each Simulator you will need to make sure there is a path set, more details can be found at: Client:Settings#File_Paths
NOTE: MSFS We will be requiring the location of your Community & Official Folder, all others should be pointed to the root directory of the simulator.
Click Next
Step 3: First Time Configuration Wizard (Step 2)
On this window you will be asked to choose your preferred settings.
Log Level: How much detail do you want in your logs, During diagnostics we will ask this to be increased via settings to enhanced.
Updates: The default option of "Normal" is sufficient for most connections, however if you have a slow bandwidth connection use Slow. (This is how frequently we poll to our servers).
Simbrief UN: This is your simbrief Username/UserID
Server: Choose a server from the list with a low ping (Name - Status - Ping - Users)
Nickname: Choose a nickname to be identified by on the map and client lists.
Discord Access: Can We access discord to show you are using UniFly?
Click Finish, an "Installation Complete" message will appear.
You can always change any settings in File > Settings
USING UNIFLY
Step 4: Fly!
You have now successfully installed and configured UniFly!
Simply connect to your Simulator, this will turn GREEN if we have connected correctly to an open simulator.
Each user will spawn in as your current aircraft
note: Large FENX models can cause your simulator to crash, for this reason we recommend using FSLTL or FLAI - Read more on our Model Matching Wiki Page
Hubs and further settings
Now you have successfully installed you may wish to Join a Hub so you can connect to your favourite community or virtual airline.
If you do not have a simbrief username set please file your flight plan's manually as this allows for model matching to work.


